
| 일 | 월 | 화 | 수 | 목 | 금 | 토 |
|---|---|---|---|---|---|---|
| 1 | 2 | 3 | 4 | |||
| 5 | 6 | 7 | 8 | 9 | 10 | 11 |
| 12 | 13 | 14 | 15 | 16 | 17 | 18 |
| 19 | 20 | 21 | 22 | 23 | 24 | 25 |
| 26 | 27 | 28 | 29 | 30 | 31 |
- StringWriter
- 메모리스트림
- 상관 서브 쿼리
- include 지시자
- Daemon()
- 리눅스셋팅
- 스레드그룸
- include지시자
- Linux셋팅
- include액션태그
- sleep()메소드
- 아이디중복
- InputDialog
- 리눅스세팅
- char[] String 형변환
- interrupt()
- ObjectInputStream
- MemoryStream
- interrupted()
- first-child
- ID중복
- isinterrupted()
- String char[] 형변환
- StringReader
- 동기화
- first-of-child
- 표현 언어
- Linux세팅
- 상관서브쿼리
- ThreadGroup()
- Today
- Total
다연이네
[days02] 문제 본문
문제1)
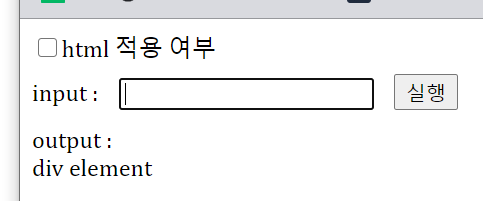
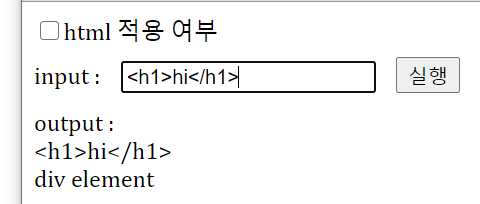
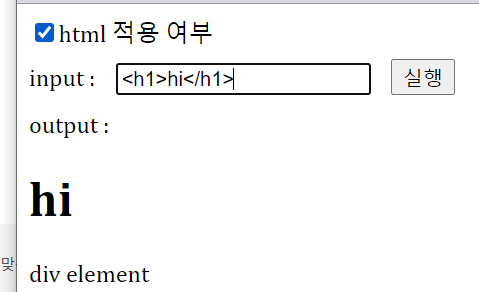
1. html 적용 여부를 체크 후
input 텍스트박스에 문자열을 입력 후 "실행버튼"을 클릭하면 output 텍스트박스에 입력값을 출력하기.
2. html 적용 여부를 체크 후
input 텍스트박스에 문자열을 입력 후 엔터(Enter)를 치면
output 텍스트박스에 입력값을 출력하기.
3. jquery 로 똑같은 코딩을 하기
 |
 |
 |
1-1) js로 작성
<!DOCTYPE html>
<html>
<head>
<meta charset="UTF-8">
<meta name="viewport" content="width=device-width, initial-scale=1.0">
<title>Insert title here</title>
<script src="https://ajax.googleapis.com/ajax/libs/jquery/3.5.1/jquery.min.js"></script>

<style>
input[type=text]{
margin:10px;
}
</style>

</head>
<body>

<input type="checkbox" id="ck" />html 적용 여부
<br>
input : <input type="text" id="msg" name="msg" autofocus="autofocus" onkeyup="txt1_keyup()"/>
						<!--onkeyup = 엔터쳐도 밑으로 가게 할 함수 -->
<input type="button" value="실행" onclick="go()" />
<br>
output : <div id="demo"></div>
div element

<script>
	 function go() {
	 	var message = document.getElementById("msg").value;
	 	var ischeck = document.getElementById("ck").checked; //boolean형으로 받기
	 	var demo = document.getElementById("demo");
	 	if(ischeck){
	 		demo.innerHTML = message;
	 	}else{
	 		demo.innerText = message;
	 	}

	 }

	 function txt1_keyup() { //엔터쳤을때 나오게하기
		//console.log(event.which);
		if(event.keyCode==13){
			go();
		}
	}

</script>
</body>
</html>
1-2) jQuery로 작성
<!DOCTYPE html>
<html>
<head>
<meta charset="UTF-8">
<meta name="viewport" content="width=device-width, initial-scale=1.0">
<title>Insert title here</title>
<script src="https://ajax.googleapis.com/ajax/libs/jquery/3.5.1/jquery.min.js"></script>

<style>
input[type=text]{
margin:10px;
}
</style>

</head>
<body>
<input type="checkbox" id="ck" /><label for="ck">html 적용 여부</label>
<!-- 글자클릭해도 체크되게 동기화 시키려면 라벨 줘서 for로 묶기 -->
<br>
input : <input type="text" id="msg" name="msg" />
<input type="button" value="실행"  />
<br>
output : <div id="demo"></div>
div element


<script>

$(document).ready(function() {
	/*$("input[type=button]").click(function() {
		console.log("cc")
	});*/
	//앞으로 이렇게 할것 같으면
	$(":button").click(function() { //jQuery에 사용되는 selector(선택자로)
												  // input[type=button] == :button
		//is(:checked)
		//prop("checked") 뭐써도 상관없다 (prop는 다른 속성들도 가져온다 checked뿐아니라)
		//attr()  나중에 이거는 자세히 배울 것

		//alert($("#ck").prop("checked")); 둘다 잘 나온다
		//alert($(":checkbox").prop("checked")); 잘 기억해두기

		if ($(":checkbox").prop("checked")) {
			//$("#demo").html ($("#msg").val());
			$("#demo").html( $(":text").first().val()); //첫번째 text의 밸류값 가져와라
			//jquery 함수 : first() last()
		} else {
			$("#demo").text ($("#msg").val());
		}
	});

	//이벤트 트리거
	$(":text").keyup(function(event) {
		if(event.which==13){ //which나 keyCode 상관 없음 ==13
			$(":button").click();
		}
	})

});

</script>
</body>
</html>
기억하기 1 - $("input[type=button]") == $(":button")
$("input[type=button]")
	$(":button")
    //jQuery에 사용되는 selector(선택자로)
    // input[type=button] == :button
checkbox의 id(#ck)를 줘도 되지만 :checkbox라고 해도 된다.
alert($("#ck").prop("checked")); //둘이 같은 의미
alert($(":checkbox").prop("checked"));//잘 기억해두기
기억하기 2 - jquery 함수 : first() last()
$("#demo").html ($("#msg").val());
$("#demo").html( $(":text").first().val()); //첫번째 text의 value값 가져와라, 윗줄과 같은의미
기억하기 3 - 이벤트 트리거 : 엔터쳐도 넘어가게 하기
//이벤트 트리거
	$(":text").keyup(function(event) {
		if(event.which==13){ //which나 keyCode 상관 없음 ==13
			$(":button").click();
		}
	})
문제2)
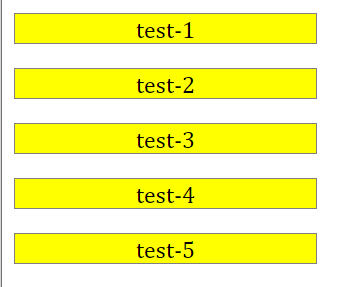
1. p 요소에 마우스를 올리면 테두리 색상을 빨강으로 마우스를 내리면 원래 색상으로 바꾸고
2. p 요소를 클릭하면 숨기기
3. 위의 코딩을 jquery 로 똑같은 코딩을 하기.
 |
 |
 |
2-1 js로 작성
<!DOCTYPE html>
<html>
<head>
<meta charset="UTF-8">
<meta name="viewport" content="width=device-width, initial-scale=1.0">
<title>Insert title here</title>
<script src="https://ajax.googleapis.com/ajax/libs/jquery/3.5.1/jquery.min.js"></script>
<style>
p{
background: yellow;
border:1px solid gray;
width: 200px;
text-align: center;
}
</style>
</head>
<body>
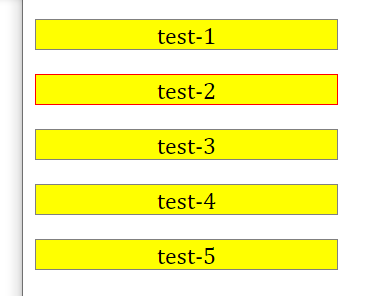
<p onmouseover="p_msover(this)" >test-1</p>
<p onmouseover="p_msover(this)" >test-2</p>
<p onmouseover="p_msover(this)" >test-3</p>
<p onmouseover="p_msover(this)" >test-4</p>
<p onmouseover="p_msover(this)" >test-5</p>
<script>
function p_msover(obj) {
obj.style.borderColor="red"; //이벤트를 받은 객체
}
var pList = document.getElementsByTagName("p");
// p_msover처럼 똑같은 코딩 50번 하지말고 목록 얻어오기
//alert(pList.length); //목록.length = 해당 태그의 개수
//pList[0].style.backgroundColor="green";
for (var i = 0; i < pList.length; i++) {
//pList[i].이벤트명=무명메소드(){} 이벤트 핸들러를 등록하는 작업
//동적으로 이벤트 등록, 처리
pList[i].onmouseout=function(){
event.srcElement.style.borderColor="gray";
};
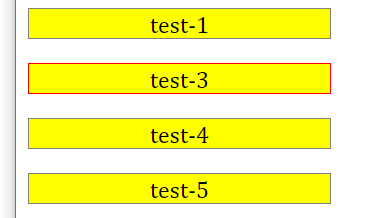
pList[i].onclick=function(){
event.srcElement.style.display="none";
};
}
</script>
</body>
</html>
기억하기 1 - 이벤트 핸들러 등록
동적으로 이벤트 등록, 처리하기
=> pList[i].이벤트명=무명메소드(){}
만약 onmouseout()을 태그 속에 10번 써야한다면 그러지 말고 동적으로 처리하자
var pList = document.getElementsByTagName("p");

for (var i = 0; i < pList.length; i++) {
	pList[i].onmouseout=function(){
		event.srcElement.style.borderColor="gray";
	};

	pList[i].onclick=function(){
		event.srcElement.style.display="none";
	};
}
2-2 jQuery로 작성
<!DOCTYPE html>
<html>
<head>
<meta charset="UTF-8">
<meta name="viewport" content="width=device-width, initial-scale=1.0">
<title>Insert title here</title>
<script src="https://ajax.googleapis.com/ajax/libs/jquery/3.5.1/jquery.min.js"></script>

<style>
p{
border:1px solid gray;
width: 200px;
text-align: center;
}
</style>

</head>
<body>

   <p>test 1 </p>
   <p>test 2 </p>
   <p>test 3 </p>
   <p>test 4 </p>
   <p >test 5 </p>

   <script>

   $(document).ready(function() {

	   //체인
	  /*  $("p")
	   .mouseover(function() {
			$(this).css("border-color", "red");
		})
		.mouseout(function() {
			$(this).css("border-color", "gray");
		}) */

		$("p")
		.click(function() {
			$(this).hide();
		})
		.hover(
		function(event) {
			$(this).css("border-color", "red");
		},function(event){
			$(this).css("border-color", "gray");
		}
	 );
   });

   </script>
</body>
</html>
기억하기 2 - 체인
밑 두 코딩은 같은 의미이며, 2번째 코딩이 체인처럼 연결한 구조이다.
 $(document).ready(function() {
		$("p").click(function() {
			$(this).hide();
		});

		$("p").mouseover(function() {
			$(this).css("border","2px solid red");
		});

		$("p").mouseleave(function() {
			$(this).css("border","1px solid gray");
		});

	});
$(document).ready(function() {
$("p")
.click(function() {
$(this).hide();
})
.hover(
function(event) {
$(this).css("border-color", "red");
},function(event){
$(this).css("border-color", "gray");
}
);
기억하기 3 - hover (앞, 뒤)
앞은 마우스를 올렸을 때, 뒤는 마우스를 내릴 때를 의미한다.
.hover(
	function(event) {$(this).css("border-color", "red");}
	,function(event){$(this).css("border-color", "gray");}
	 );
'Web > JavaScript' 카테고리의 다른 글
| [days02] js 연산자 (0) | 2020.12.10 |
|---|---|
| [days02] js 위치와 기본 특징 (0) | 2020.12.10 |
| [days01] 버튼으로 전구 켜고끄기 (0) | 2020.12.09 |
| [days01] event.srcElement 속성 (0) | 2020.12.09 |
| [days01] x.innerHTML == $("#").html($("#").val())와 jQuery의 if문 (0) | 2020.12.09 |


